Product Overview
The Gaggia Brera is a compact automatic espresso machine, offering ceramic grinders, customizable settings, and a user-friendly interface. Ideal for home use, it provides a perfect coffee experience.
1.1 Key Features of the Gaggia Brera
The Gaggia Brera is a compact automatic espresso machine designed for home use. It features ceramic grinders for consistent coffee grinding and customizable settings to tailor your coffee experience. The user-friendly interface makes it easy to navigate and adjust preferences. This machine is perfect for those seeking a high-quality coffee experience without the complexity of professional-grade equipment.
1.2 Design and Build Quality
The Gaggia Brera features a sleek and compact design, making it ideal for modern kitchens. Built with high-quality materials, it combines durability and style. The machine’s stainless steel components and intuitive interface enhance its appeal, ensuring both functionality and aesthetics. Its robust construction ensures long-lasting performance, while the ergonomic design provides ease of use and maintenance.
Understanding the Control Panel
The Gaggia Brera’s control panel is intuitive, featuring buttons for espresso, coffee, and customization. The clear display simplifies navigation, allowing users to adjust brew strength and temperature effortlessly.
2.1 Navigation and Button Functions
The Gaggia Brera’s control panel features intuitive navigation with clearly labeled buttons for espresso, coffee, and customization. The rotary dial allows easy adjustment of brew strength, while the display provides clear feedback. Dedicated buttons enable quick access to functions like steam, temperature, and pre-programmed settings, making operation straightforward for users of all experience levels.

2.2 Customizable Settings and Options
The Gaggia Brera offers extensive customization options, allowing users to tailor their coffee experience. Adjustments include grind size, brew temperature, and volume. The machine also features programmable profiles, enabling users to save their favorite drink settings. Additionally, the ceramic grinder can be fine-tuned for optimal flavor extraction, ensuring each cup meets personal preferences with precision and consistency.
Installation and Setup
Unbox and prepare the Gaggia Brera by placing it on a stable surface. Connect to a power source and water supply, ensuring proper installation for optimal performance.
3.1 Unboxing and Initial Preparation
Begin by carefully unboxing the Gaggia Brera and placing it on a stable surface. Remove all packaging materials and protective covers. Inspect the machine for any damage. Plug in the power cord and ensure access to a water supply. Allow the machine to heat up and perform its initial self-test cycle before first use.

3.2 Connecting to Power and Water Supply
Connect the Gaggia Brera to a nearby power outlet using the provided cord. Ensure the machine is placed near a water source. Attach the water tank securely, making sure it clicks into place. Plug in the machine and turn it on to initiate the automatic priming process, which prepares the internal system for brewing.
Maintenance and Cleaning
Regular cleaning ensures optimal performance. Descale every 2-3 months and rinse the brew group daily. Replace water filters as recommended for best taste and longevity.
4.1 Daily Cleaning Routine
Start by turning off the machine and unplugging it for safety. Wipe the exterior with a damp cloth and clean the drip tray. Remove and rinse the brew group, then reattach it. Run a cleansing cycle if available. Empty the used coffee grounds container and wash it with warm water. Regular cleaning prevents old residue buildup and maintains flavor quality.
4.2 Descaling and Water Filter Maintenance
Descaling is essential to remove mineral buildup. Use a compatible descaler, following the manual’s instructions. Run the solution through the machine, then rinse thoroughly with clean water. Replace the water filter every 2-3 months or as indicated. Regular descaling and filter changes ensure optimal performance, prevent damage, and maintain water quality for the best-tasting coffee.
Troubleshooting Common Issues
The Gaggia Brera may display error codes for issues like clogs or incorrect settings. Refer to the manual for code meanings and perform routine maintenance to resolve them.
5.1 Error Codes and Their Meanings
The Gaggia Brera displays specific error codes to indicate issues. For example, code 1 may signal a blockage in the coffee grounds container, while code 2 could indicate a problem with the water supply. Refer to the manual for a comprehensive list of codes and their meanings to diagnose and address problems effectively.
5.2 Resolving Common Operational Problems
Common issues with the Gaggia Brera include blockages or descaling needs. To resolve, ensure the waste bin is emptied and check for bean hopper obstructions. Descaling regularly prevents mineral buildup. If the machine stops responding, power cycle it or reset to factory settings. Always refer to the troubleshooting guide for detailed solutions and maintenance tips to ensure optimal performance.
Customization and Personalization
The Gaggia Brera allows users to customize grind size, brew strength, and temperature. Users can also program custom drink options for personalized coffee experiences tailored to their preferences.
6.1 Adjusting Grind and Brew Settings
The Gaggia Brera features adjustable ceramic grinders, allowing precise control over grind size. Users can customize brew strength by selecting from multiple settings. The machine also permits temperature adjustment, ensuring optimal extraction. These settings can be easily modified via the control panel, enabling users to tailor their coffee experience to suit their taste preferences perfectly every time.
6.2 Programming Custom Drink Options
The Gaggia Brera allows users to program custom drink options, including espresso, cappuccino, and latte. Through the control panel, you can save personalized settings for strength, cup size, and milk preferences. This feature ensures your favorite coffee drinks are ready at the touch of a button, offering convenience and consistency in every brew. Perfect for tailoring your daily coffee ritual.
User Manual and Documentation
The Gaggia Brera manual provides detailed instructions for operation, maintenance, and troubleshooting. Available in digital formats, it ensures easy access to comprehensive guides for optimal machine performance and customization.
7.1 Navigating the Gaggia Brera Manual
Navigating the Gaggia Brera manual is straightforward. The guide is structured into sections like installation, operation, and troubleshooting. Users can easily locate information on maintenance routines, error codes, and customization options. The manual also includes diagrams and step-by-step instructions to help users understand and utilize the machine’s features effectively. This ensures a seamless experience for both novices and experienced users.
7.2 Downloading and Accessing Digital Copies
Digital copies of the Gaggia Brera manual are easily accessible online. Users can download PDF versions from official sources like Gaggia’s website or platforms such as Manualagent. These digital manuals include detailed instructions, diagrams, and troubleshooting guides. They are searchable and can be saved for offline use, ensuring convenience and easy reference for users to explore features and resolve issues efficiently.
Accessories and Compatible Products
The Gaggia Brera supports various accessories, such as water filters and cleaning kits, to enhance functionality. Compatible coffee beans and consumables ensure optimal performance and flavor preservation.
8.1 Recommended Accessories for Enhanced Functionality
The Gaggia Brera can be enhanced with accessories like water filters, cleaning kits, and descaling solutions. Additional items such as coffee grinders, milk frothing pitchers, and storage containers improve functionality. These accessories ensure optimal performance, maintain hygiene, and extend the machine’s lifespan. They are available online and designed to work seamlessly with the Brera model.
8.2 Compatible Coffee Beans and Consumables
The Gaggia Brera works seamlessly with a variety of coffee beans, including Lavazza and other premium brands. For optimal flavor, medium to dark roasts are recommended. Compatible consumables include water filters, cleaning tablets, and descaling solutions. These ensure proper machine maintenance and extend its lifespan. Using high-quality beans and genuine consumables enhances the brewing experience and preserves the machine’s performance.

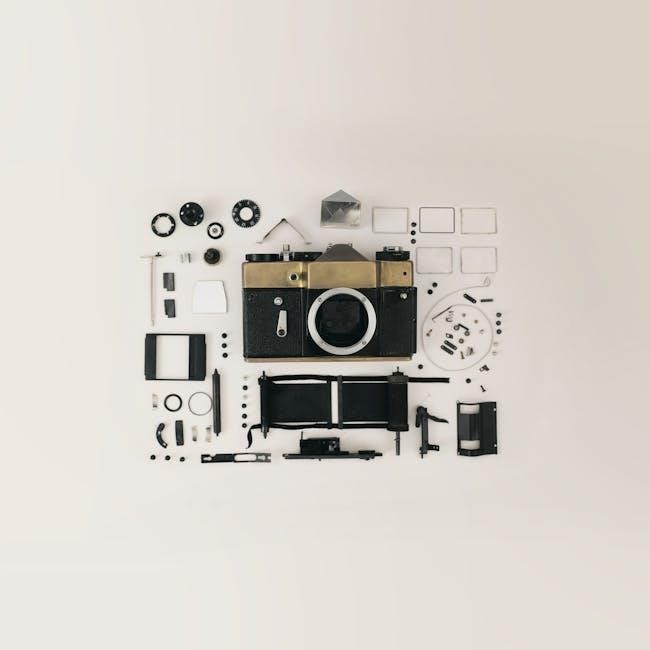
Repair and Replacement Parts
The Gaggia Brera features replacement parts available with specific codes, as detailed in the inventory document. This allows users to identify and order parts easily for maintenance.
9.1 Identifying and Ordering Replacement Parts
The Gaggia Brera’s replacement parts can be identified using the inventory list, which details 32 components with specific codes. Users can select the desired part from the list, download the corresponding file, and proceed to order. This streamlined process ensures accurate identification and efficient purchasing, minimizing delays in repairs.
9;2 DIY Repair vs. Professional Service
While minor repairs like replacing worn parts can be handled with DIY kits and manuals, complex issues require professional expertise. Users with technical skills can attempt DIY fixes, but intricate problems may void warranties if not done correctly. Consulting the manual or seeking professional service is recommended for maintaining machine performance and longevity.
Customer Support and Resources
Gaggia offers comprehensive customer support through phone, email, and online resources. Users can access troubleshooting guides, FAQs, and forums for assistance with the Brera machine.
10.1 Contacting Gaggia Support
Gaggia provides dedicated customer support for the Brera model. Users can contact support via phone or email for assistance. Additionally, the official website offers extensive resources, including FAQs, troubleshooting guides, and downloadable manuals. Online forums also provide a community-driven support network. For the best experience, ensure your product is registered for warranty and updates.
10.2 Online Communities and Forums
Active online communities and forums dedicated to the Gaggia Brera provide valuable peer support and shared knowledge. Users can discuss tips, troubleshooting, and customization. These platforms often feature detailed guides, FAQs, and user-generated content. Engaging with these communities enhances your experience and helps resolve issues through collective expertise and real-world insights from fellow Brera owners.
Tips for Optimal Performance
Regular cleaning and descaling ensure consistent performance. Use freshly roasted beans for optimal flavor. Adjust grind settings for the perfect espresso every time.
11.1 Best Practices for Brewing Coffee
Use freshly roasted, high-quality coffee beans and adjust grind settings for optimal extraction. Ensure the portafilter is tightly secured and evenly tamped. Preheat your cups and maintain water temperature between 195°F and 205°F for ideal brewing conditions. Regularly clean and descale the machine to prevent mineral buildup and maintain flavor consistency. Experiment with settings to find your perfect cup.
11.2 Maximizing Machine Longevity
Regularly clean and descale the machine to prevent mineral buildup. Replace worn-out parts promptly and store the device in a dry, cool place. Use filtered water to minimize scale formation and avoid harsh cleaning agents. Perform routine maintenance as outlined in the manual, and ensure all components are functioning properly for consistent performance and extended lifespan.